Diamond Lapidary Blade Articles

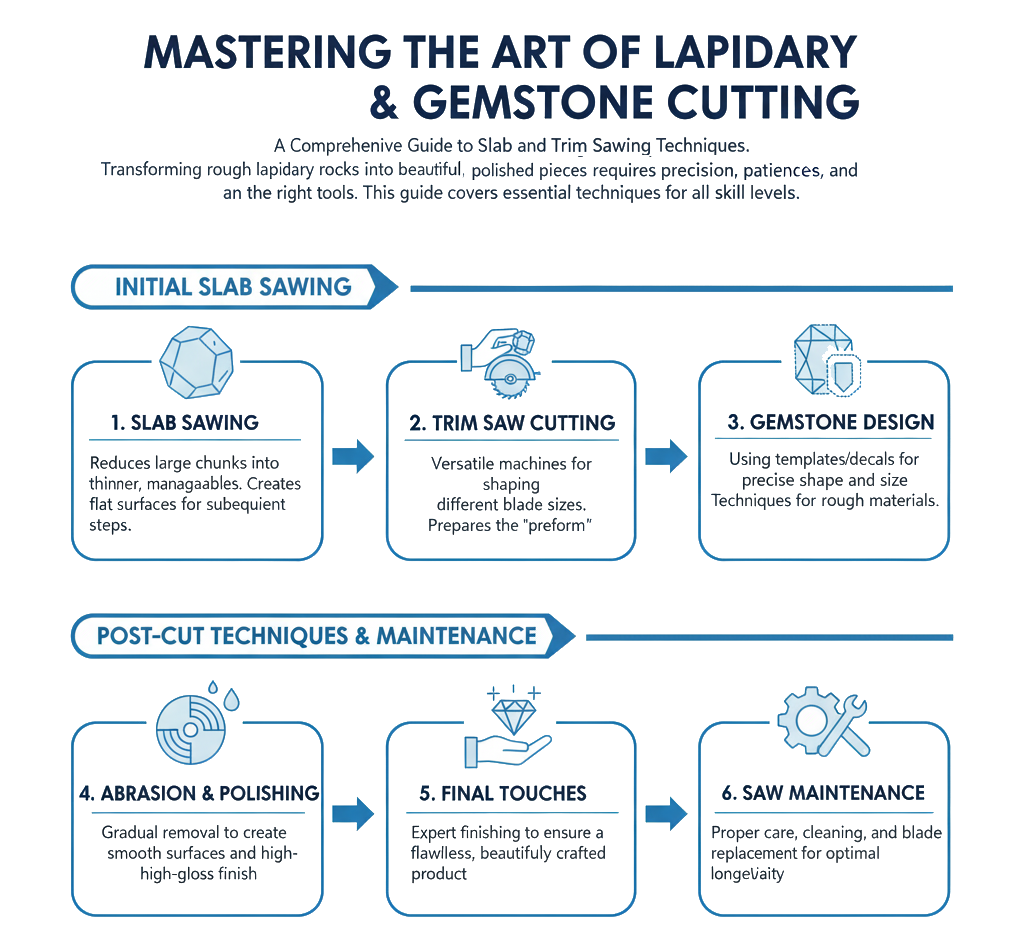
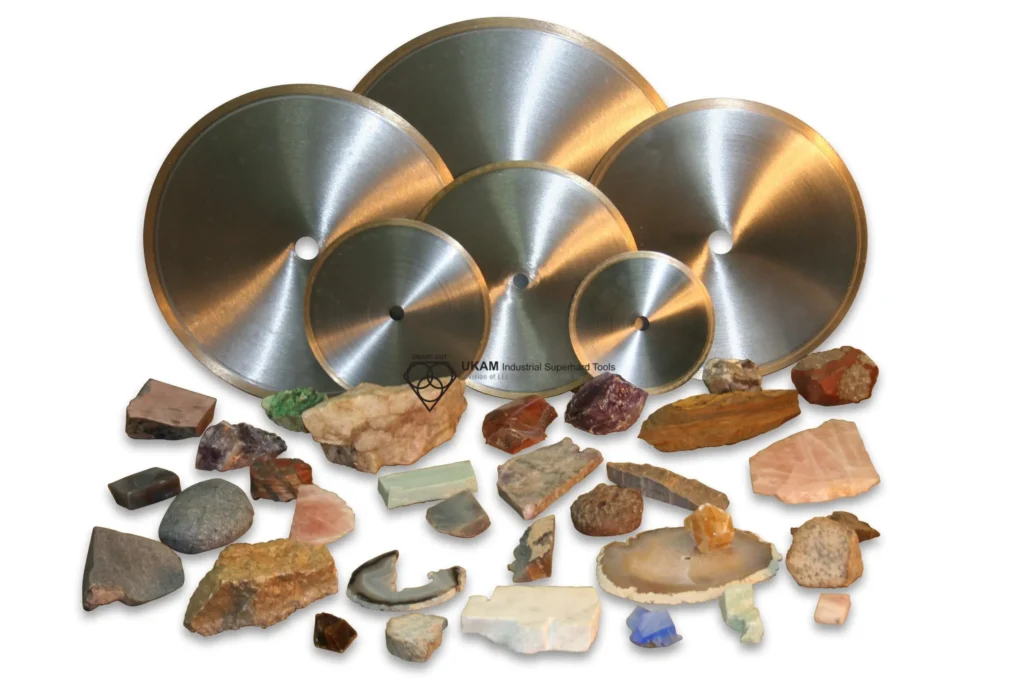
Mastering the Art of Lapidary cutting

Mastering the Art of Lapidary, Gemstone, Cabochon, & Slab Cutting: A Comprehensive Guide to Slab and Trim Sawing Techniques

diamond art tool

The process of transforming rough lapidary rocks & gemstones into beautiful, polished pieces is both an art and a science, requiring precision, patience, and the right tools. Diamond lapidary blades are essential for cutting and shaping lapidary materials, gemstones, and this guide is designed to provide detailed instructions on their proper use, catering to enthusiasts of all skill levels. From slab sawing to creating a preform, and from saw maintenance to helpful hints for handling small rough material, every step is crucial in the lapidary process.

It's designed to equip both novices and experienced craftsmen with the knowledge and skills needed to master the art of lapidary and gemstone cutting, covering everything from selecting the appropriate saw and blade to the final touches that ensure a beautifully finished product.

Slab sawing, the initial step in this transformation, reduces large chunks of gem material into thinner, manageable pieces. This guide introduces you to the basics of slab sawing, detailing the processes and precautions necessary to create flat surfaces on gemstones, which are indispensable for the subsequent steps of abrasion and polishing.

Following the introduction to slab sawing, we explore the nuanced world of trim saw cutting machines—vital tools that offer the versatility to work with a range of blade sizes and thicknesses, tailored to the needs of different gem materials. From setting up your saw for optimal performance to securing and meticulously cutting the preform, this guide walks you through each step, ensuring clarity and confidence in your cutting endeavors.

Moreover, designing your gemstone begins with a precise template—a roadmap that guides your cuts to achieve the desired shape and size. This section of the guide emphasizes the importance of templates and decals in achieving precision and offers creative solutions for challenges such as handling small or rough gemstones. Whether you're splitting pebbles for unique jewelry designs or crafting your own gemstone slabs for larger projects, the techniques outlined here are designed to enhance your craftsmanship.

Introduction to Slab Sawing

The Basics of Slab Sawing: Slab sawing serves as the foundational step in the transformation of large chunks of gem material into thinner, manageable slices called slabs. This critical process is aimed at creating flat surfaces on gemstones, setting the stage for further abrasion and polishing to achieve the final, polished pieces.

Understanding Trim Saw Cutting Machines

Blade Sizes and Their Uses:

Trim saw cutting machines accommodate a range of blade sizes, generally between 6 to 10 inches for standard applications. Blade thickness is another variable, with thinner blades designed to conserve precious gem materials and thicker ones for more demanding cuts. For particularly valuable stones, trim saws feature ultra-thin 4- or 5-inch blades that necessitate a careful, delicate cutting approach. Beginners are encouraged to start with thicker blades and less expensive stones to hone their skills.

Setting Up Your Saw for Success:

Setting up your saw for success is a critical step in ensuring optimal performance, safety, and precision in your cutting projects. Before beginning, it's important to familiarize yourself with the manufacturer's guidelines, paying close attention to the recommendations on motor size, blade type, and arbor speed to ensure compatibility. The fit of the blade on the saw's shaft should be snug to prevent any wobble during operation, which can lead to uneven cuts and increased wear on the blade. Additionally, the alignment of the blade with the cutting table should be checked using a square or specialized tool, as proper alignment is key to achieving straight cuts and minimizing blade stress.

The coolant system plays a vital role in the cutting process, providing lubrication and cooling to prevent overheating. Fill the saw’s reservoir with the recommended type of coolant, ensuring the level is appropriate for consistent lubrication. Adjust the coolant flow to achieve a consistent mist that cools the blade and the material efficiently without causing mess or waste.

Attention should also be given to the cutting table and vise adjustments. The table should be clean, level, and free of debris to accurately secure and cut material. For saws equipped with a vise, adjust it to hold the material securely without causing damage, using padding or clamps for irregularly shaped stones if necessary.

Safety is paramount, so ensure all safety guards and shields are in place and functional to protect against flying debris and coolant spray. Familiarize yourself with the saw’s emergency stop controls for quick shutdown in case of an accident. Before starting your cutting operation, perform a final inspection of the saw, blade, coolant system, and material setup. Making a few test cuts on scrap material can help identify any setup issues before they impact your project.

Regular post-use cleaning of the saw to remove coolant, stone chips, and dust, along with scheduled inspections of the blade, motor, and coolant system, is essential. This proactive maintenance approach prevents unexpected breakdowns and ensures the saw remains in peak condition, ready for your next lapidary project. By meticulously following these setup and maintenance practices, you can enhance your saw's cutting efficiency, maintain the integrity of your materials, and ensure a safer working environment, leading to more satisfying results and a longer lifespan for your equipment.

Securing and Cutting the Preform:

Securing and cutting the preform are critical steps in the process of transforming a gemstone slab into its final form, demanding precision and stability throughout. The initial stage involves ensuring the trim saw table is firmly secured to the tank, eliminating any movement that could compromise the accuracy of the cut. This stability is not just about physical setup; it also involves preparing the material and the equipment to work in harmony.

Designing Your Gemstone: The Importance of a Template

Crafting the Perfect Outline:

Before diving into the cutting process, it's crucial to draft a detailed outline on the slab that reflects the gem's intended shape and size. Rock hobby stores offer an extensive selection of templates, featuring a variety of shapes such as ovals, rectangles, circles, and teardrops, tailored to match standard jewelry settings. For a more adhesive option, pressure-sensitive decals in assorted gem shapes can be applied directly to the stone.

Place the template on the slab and shift it around to select the most visually appealing section for the cut. Use a sharpened aluminum or brass wire, a lead pencil, or a fine felt-tip pen to trace the outline, reinforcing it with spray acrylic or fixative to ensure durability during the cutting process. For a custom approach, craft your adhesive outline using contact paper or masking tape, then precisely cut and attach it to the slab. This preparation sets the stage for accurate preform cutting by outlining direct and diagonal lines on the stone.

Executing the Cut: From Outline to Preform

Initiating the Cut with Precision:

With the trim saw activated and the coolant flowing, place the slab on the table and carefully guide it toward the blade, starting at one of the marked rectangle edges. The aim here is to grind a channel through the stone with minimal pressure, avoiding any blade deflection by sharp stone edges.

Completing the Shape and Detailing Corners:

After establishing the main shape by cutting along the rectangle, focus on the corners. Align the slab so the angled line intersects with the blade, ensuring the cut starts perpendicularly for accuracy. Slightly notch the corner before realigning the slab for the full cut, repeating this process for each corner to complete the preform. This meticulous approach ensures the preform is ready for the subsequent phases of grinding and polishing, bringing you one step closer to the finished gemstone.

Handling and Cutting Small or Rough Gemstones

Manual Cutting Techniques for Small Stones:

Even small gemstones or rough materials can be precisely cut with a trim saw. First, identify a flat surface on the stone, placing it securely on the trim saw's table.

After securing the saw table, the next step is to carefully mount the gemstone slab in the vise or clamping mechanism. The slab should be positioned so that the intended cut aligns perfectly with the blade's path. It's essential to check that the stone is firmly held in place, yet not so tightly that it risks cracking under pressure. For particularly delicate or irregularly shaped slabs, using soft materials like rubber or felt as padding can provide additional grip without damaging the stone.

The cutting of the preform requires a steady hand and an eye for detail. With a steady grip, guide the stone towards the rotating blade, focusing on making controlled, deliberate cuts for accuracy.

Adjust the saw to the appropriate speed for the type of material you're cutting, taking into account its hardness and the desired thickness of the preform. Begin the cut by gently guiding the slab into the blade, applying consistent but gentle pressure to allow the blade to do the work. It's crucial to maintain a steady feed rate to ensure a smooth, even cut, adjusting the pressure as needed based on the feedback from the saw and the material.

Coolant flow during this process is paramount to prevent overheating and to minimize dust. A well-regulated stream of coolant not only keeps the blade and stone at optimal temperatures but also aids in achieving a cleaner cut by flushing away debris from the cutting area.

Once the initial cuts are made, refining the preform might require additional passes or adjustments. This can include trimming excess material or refining the shape to more closely match the final design. Throughout this process, the emphasis remains on maintaining stability and precision, ensuring that each cut contributes to the accurate realization of the intended design.

Ensuring Straight Cuts on Uneven Surfaces:

Commit to making straight cuts. If the stone lacks a flat side, prepare one using a grinding wheel. This method is particularly relevant for pebbles, which require extra care to avoid slipping during cutting. After cutting, you'll have a prepared surface ready for further shaping.

Crafting a Sawing Jig for Pebbles

Creating Matching Stones from Pebbles:

Splitting pebbles can often result in two complementary stones, ideal for various jewelry designs. To enhance safety and precision when sawing pebbles, a homemade sawing jig can be invaluable. Construct the jig by drilling several large holes into a block of wood (½- to ¾-inch thick), then cutting slots leading into these holes. Place each pebble in a hole, stabilize with melted paraffin, and saw through the slots. This setup ensures smooth, controlled cuts, allowing for efficient slicing of pebbles into desired shapes.

Maximizing the Use of a Trim Saw for Slab Creation

Crafting Your Own Gemstone Slabs:

While purchasing pre-cut slabs is a common approach, utilizing a trim saw allows for the direct production of slabs from rough materials. Creating your own gemstone slabs offers unparalleled control over the material's dimensions, thickness, and overall quality, making your lapidary projects truly custom and unique. Many trim saws are equipped with vises on adjustable carriages, enabling precise control over the thickness of the slabs cut. Models with horizontally moving jaws offer additional flexibility for cutting slabs of various thicknesses directly from rough stones.

Here are our recommendations on how to use trim saw for slab creation:

1. Strategic Planning and Preparation
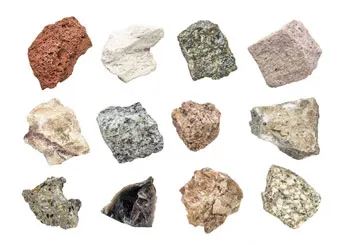
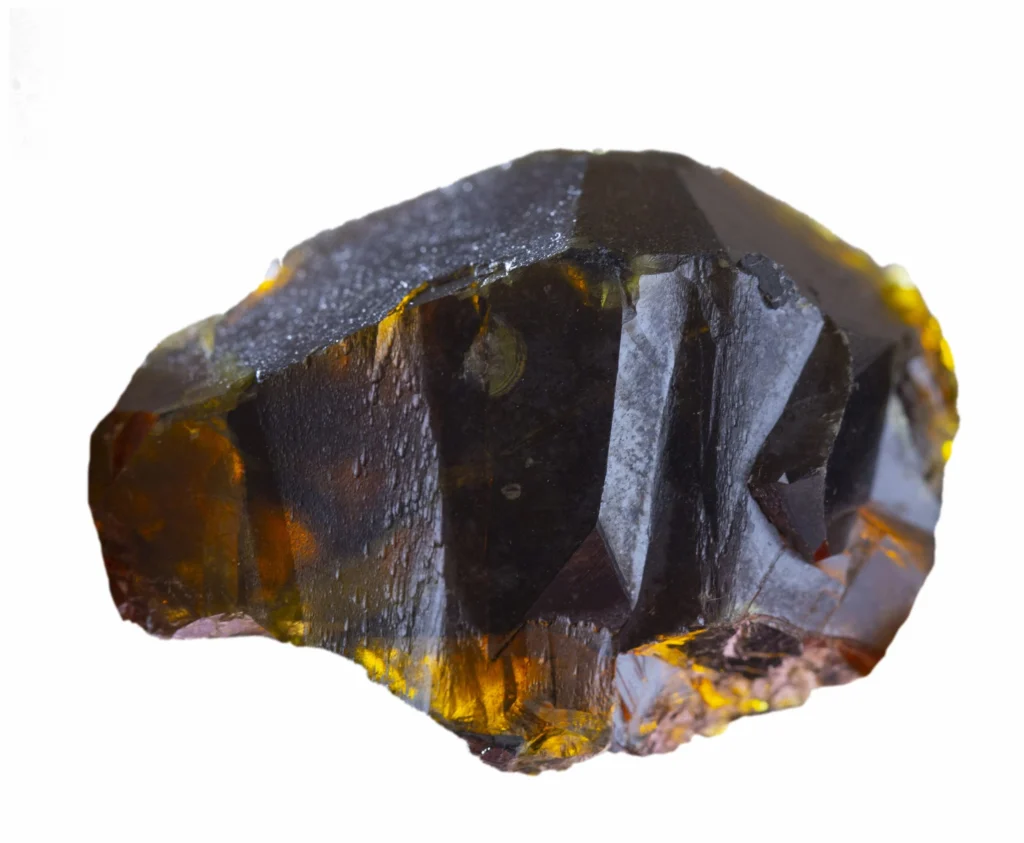
  • Material Selection: Begin with selecting the right rough material. Look for pieces that are relatively free of cracks and inclusions, as these can affect the integrity of the slab.
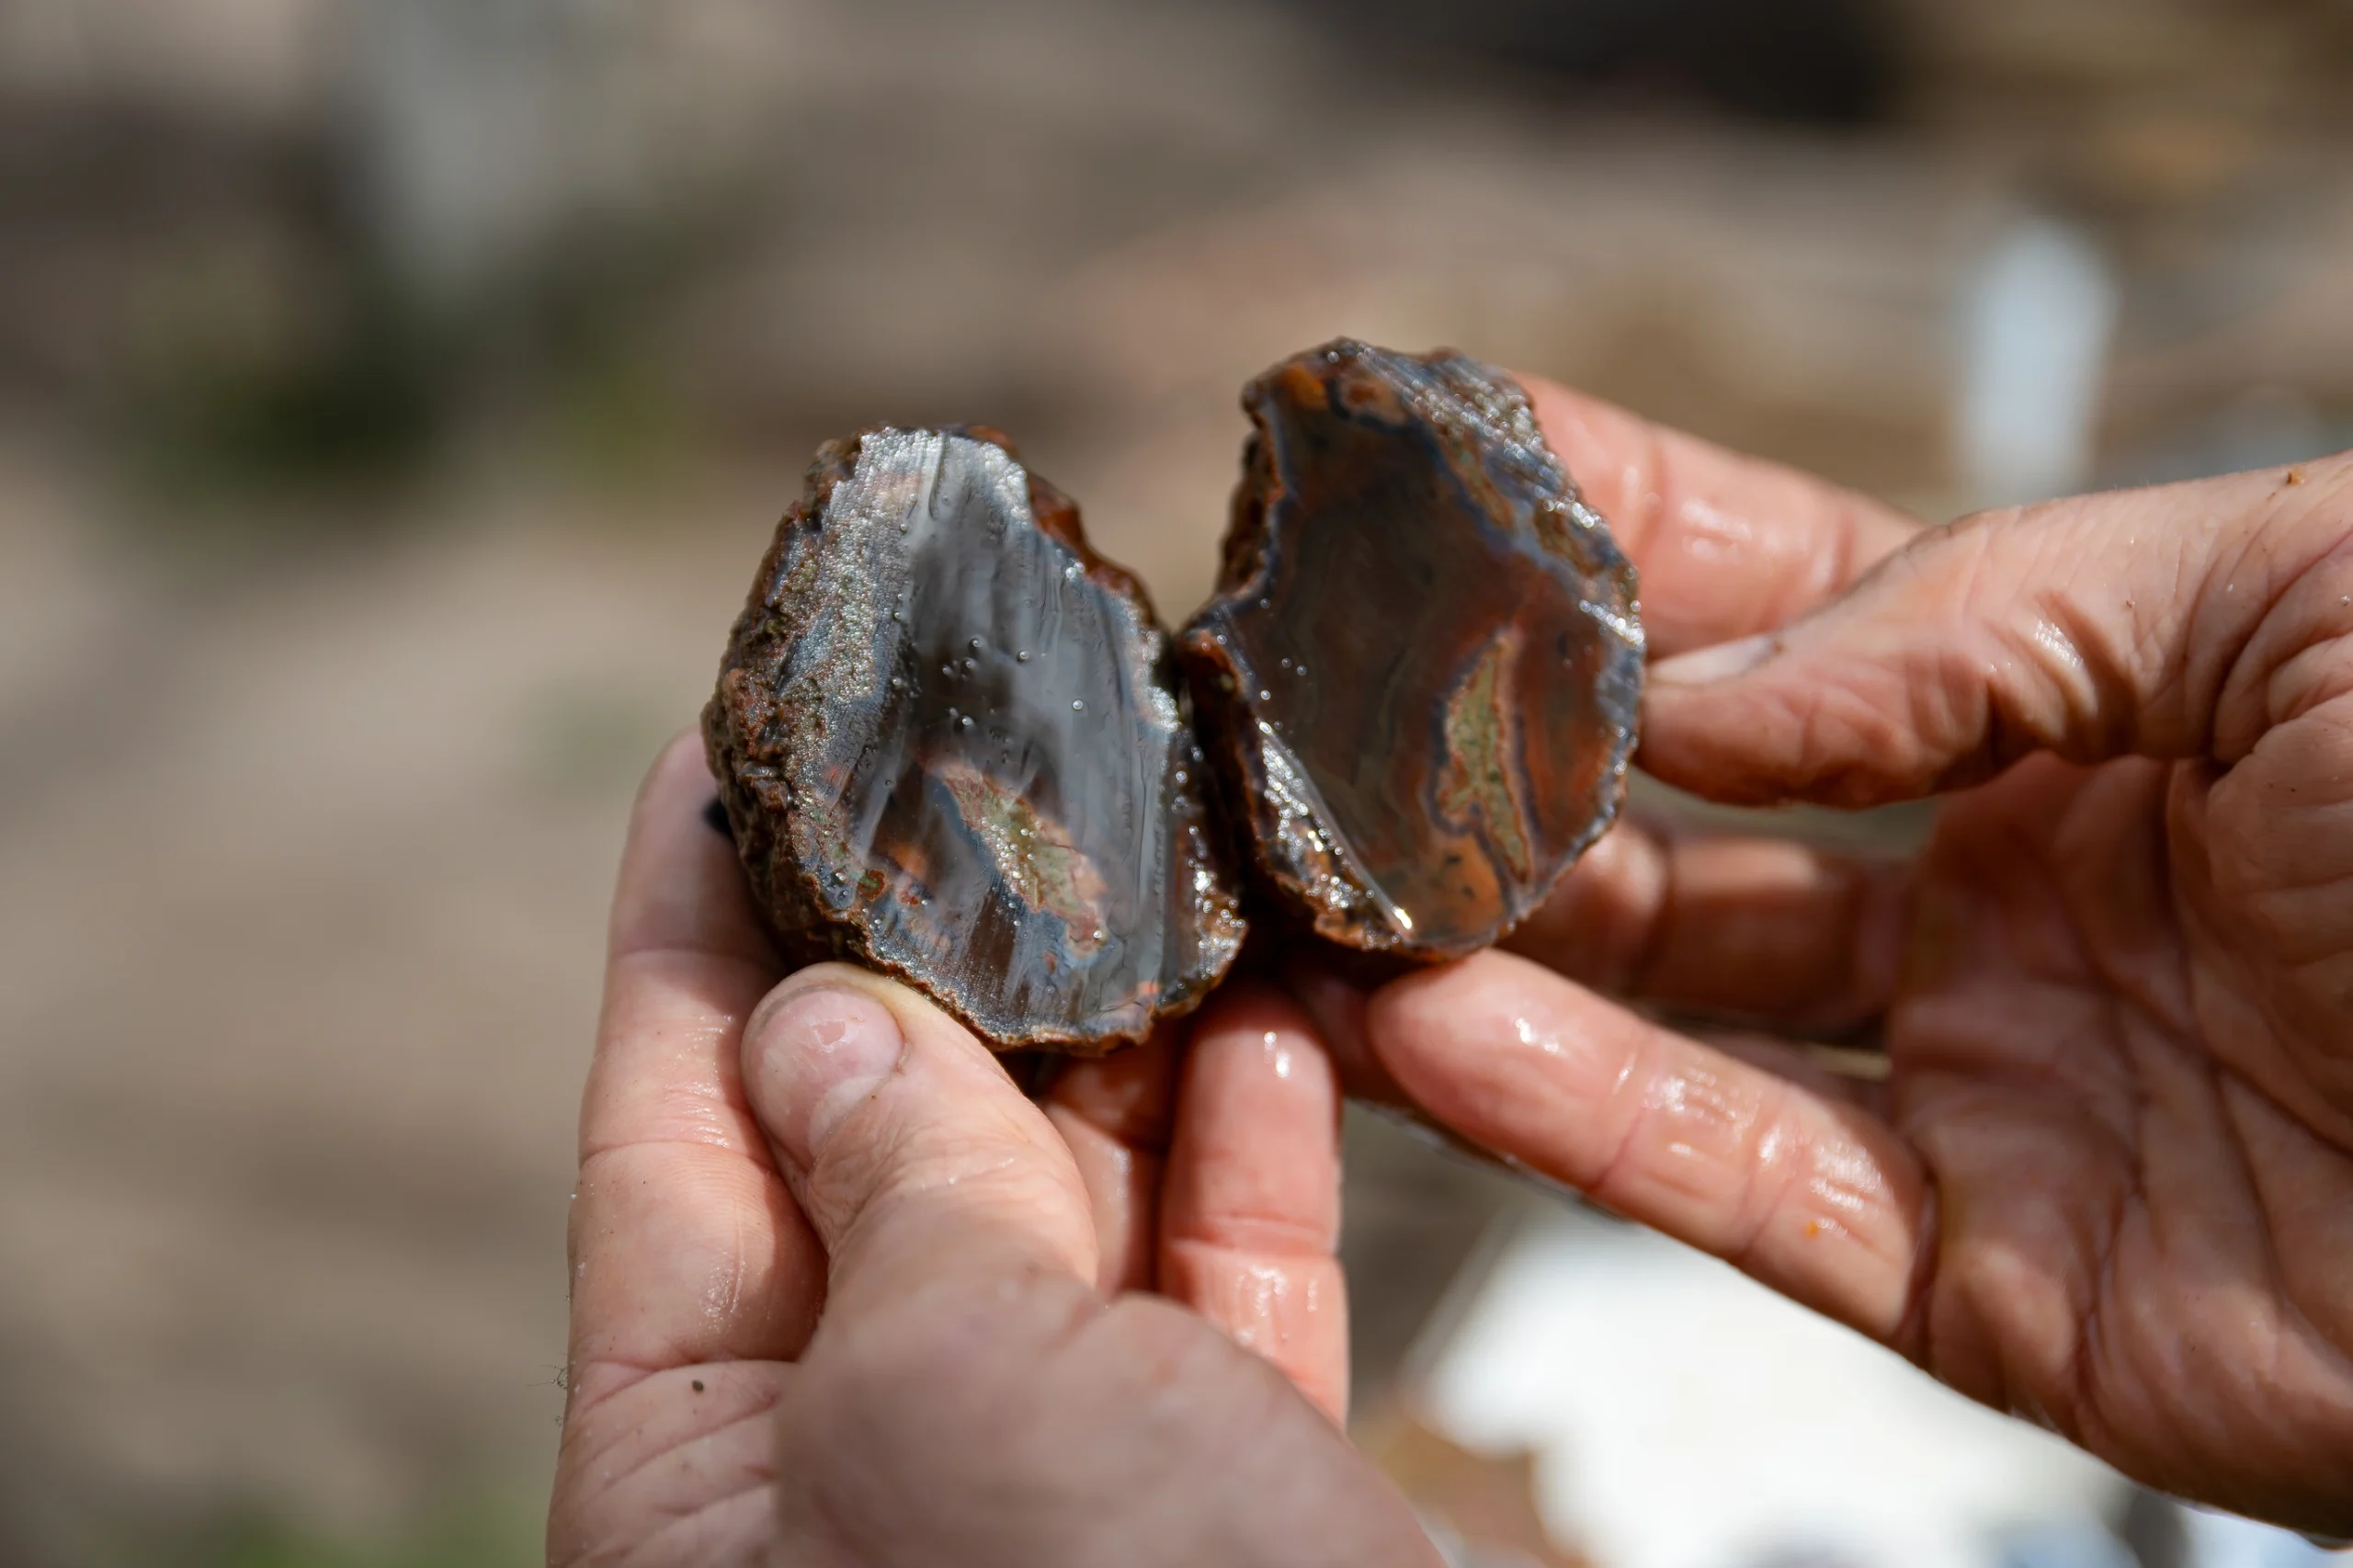
  • Orientation and Marking: Assess the rough material to determine the best orientation for slabbing. Consider the grain, natural patterns, and potential flaws. Mark your intended cuts clearly on the rough stone to guide the slabbing process.
2. Adjusting for Optimal Slab Thickness
  • Thickness Considerations: Decide on the thickness of your slabs based on their intended use. Thicker slabs may be necessary for large pieces or items requiring substantial carving, while thinner slabs are suitable for smaller, delicate projects.
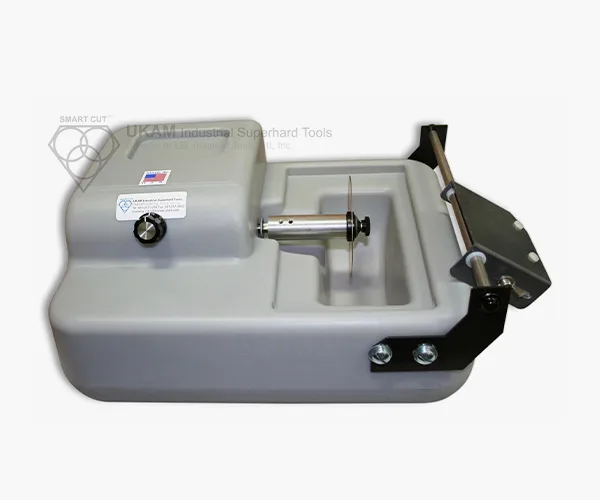
  • Using Adjustable Carriages and Vises: Familiarize yourself with the adjustments on your trim saw to set the precise slab thickness. Practice on less valuable materials to gain confidence in setting and maintaining consistent thicknesses.
3. Techniques for Consistent Cuts
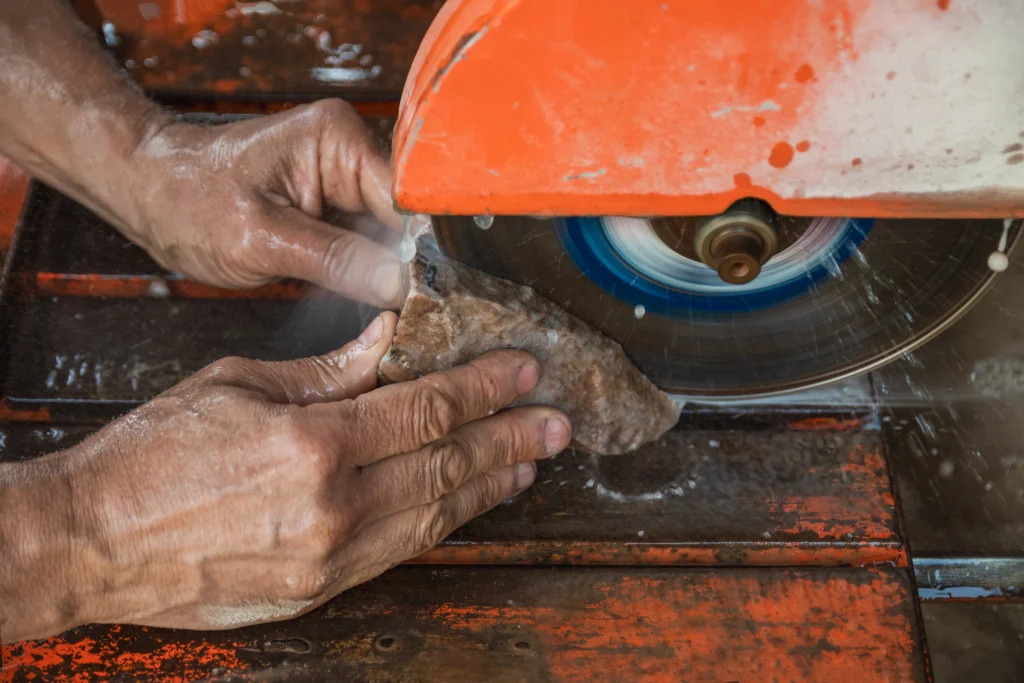
  • Feed Rate: The rate at which you feed the stone into the blade affects the quality of the cut. Too fast can result in chipping or blade jamming; too slow can cause unnecessary wear to the blade. Find a balanced feed rate that produces smooth, consistent cuts.
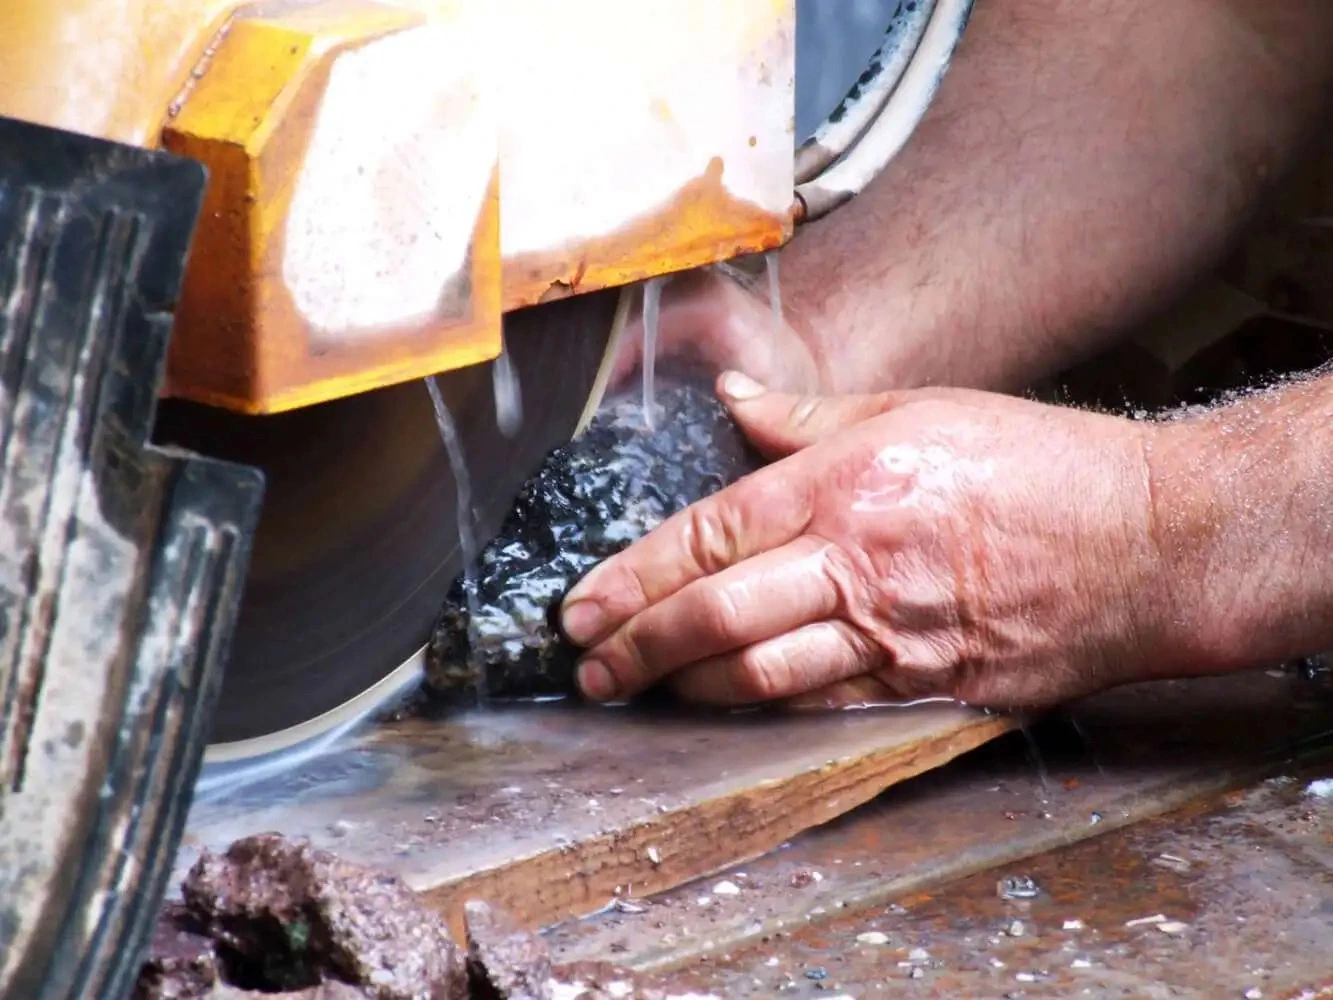
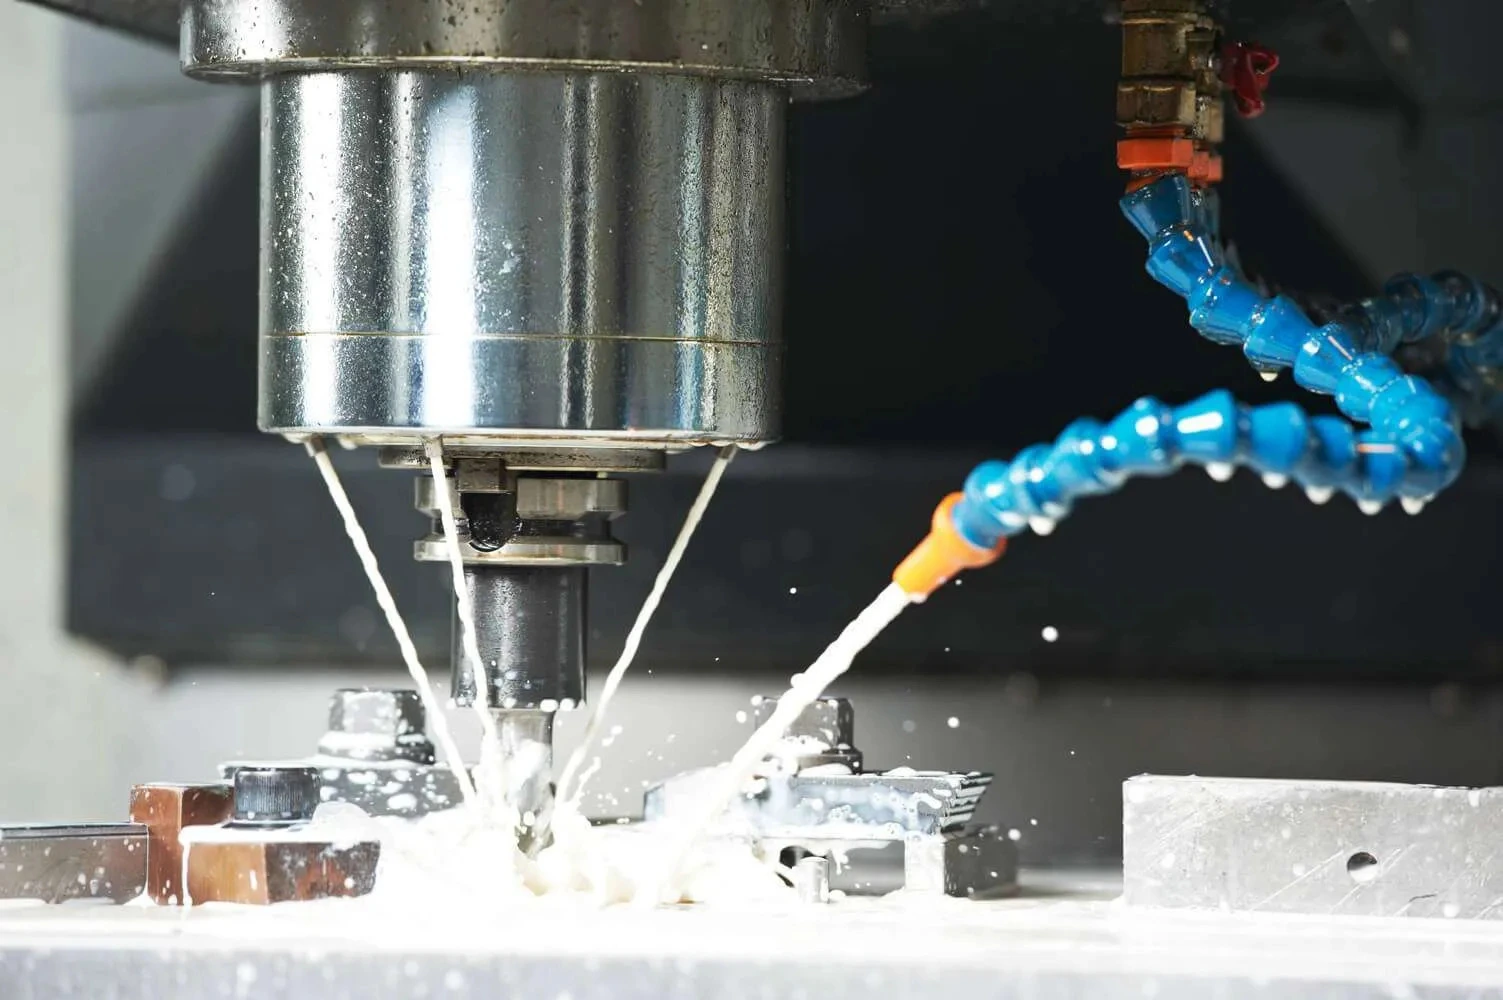
  • Coolant Use: Ensure adequate coolant flow during cutting to prevent overheating. Overheating can damage both the blade and the stone, resulting in thermal cracks and diminished blade life.
4. Handling Variations in Material
  • Adapting to Material Hardness: Different stones will require adjustments in speed, feed rate, and coolant flow. Keep notes on the settings and techniques that work best for various materials to streamline the process for future projects.
  • Cutting Multiple Slabs: When cutting several slabs from the same piece of rough, re-evaluate and adjust your settings as necessary between cuts. This is especially important as the remaining rough material decreases in size and may require different handling.
Securing Stones in the Trim Saw:

In standard configurations, a threaded rod is employed to tighten the vise's jaws securely around the stone, while a second rod adjusts the spacing on the opposite end of the jaws. Certain trim saws feature clamp vises with hardwood jaws that apply natural tension to hold the stones firmly, allowing the top jaw to adjust to different angles. Ensuring the vise's alignment with the blade is crucial for accurate cuts, a setup often established at the factory. If alignment instructions are not provided, consulting with your dealer or the manufacturer is recommended.

Implementing a Weight-Feed Mechanism for Precise Cuts

Setting Up for Slab Sawing:

The slabbing process involves moving the stone towards the blade using an external force, typically through a weight-feed mechanism. This system uses a cord or cable attached to the vise, extending across a pulley at the saw's rear. By attaching weights to the cord, the stone is fed into the blade, with the manufacturer suggesting specific weights for optimal feed. Before starting, ensure the stone is securely clamped in the vise and adjust the crossfeed to the desired slab thickness, removing any sharp edges to protect the blade. Activate the saw motor and carefully feed the stone towards the blade, initiating a precise and controlled cutting process.

Operating a Slab Saw with a Weight-Feed Mechanism

Setting Up the Saw for Cutting:

Begin by securely clamping the stone within the vise and checking for any movement by manually trying to rotate the stone. Adjust the crossfeed to your preferred slab thickness, typically 3/16 inch or 1/4 inch, and ensure all sharp edges on the stone are smoothed to prevent blade damage. Activate the saw motor and guide the stone towards the blade with minimal pressure to start the cutting groove.

Completing the Cut with Precision:

Once the initial cut is made, attach the weight to the cord and lower it gradually. This action will draw the stone and vise towards the blade automatically. Regularly check and adjust the vise's position to keep the cut aligned with the blade. To avoid a forceful breakthrough at the cut's completion, which could bend the blade, remove the weight and finish the cut manually. If a small protrusion remains on the stone, use a chain or similar method to prevent sudden vise movement, ensuring a smooth finish.

Utilizing Power Feed Saws for Larger Projects

Adapting to Larger Gemstone Cutting:

Power feed saws, designed to automatically advance the vises and stones towards the blade, replicate the method employed by larger slab saws. For many artisans, a trim saw with a slabbing vise is adequate for working with stones up to fist size. Yet, for larger lapidary and

gemstone projects requiring slabs for cabochons, bookends, clocks, or spheres, a larger slab saw is essential. These robust saws, which can accommodate blades ranging from 12 to 36 inches in diameter, enable the handling of a wider variety of gemstone sizes. Manufacturers typically include specific instructions for these saws to ensure their effective and safe operation.

Optimal Saw Running Speeds

Understanding and adjusting the saw's running speed is crucial for maximizing the efficiency of your cuts and extending the life of your blades. Different materials require different cutting speeds to minimize damage and wear to both the stone and the blade. Here's an in-depth look at optimizing saw running speeds:

1. Importance of Running Speeds
  • Material Compatibility: The hardness and abrasiveness of the material being cut dictate the optimal speed. Harder materials generally require slower speeds to reduce blade wear, while softer materials can be cut at higher speeds.
  • Blade Longevity: Operating at the manufacturer-recommended speeds not only ensures efficient cutting but also prolongs the life of the blade by reducing heat buildup and preventing premature diamond loss.
2. Understanding Surface Feet per Minute (sfpm)
  • Definition: Sfpm measures the distance in feet that the blade travels along its cutting edge in one minute. It's a crucial indicator of how fast the blade is cutting through the material.
  • Adjustment for Material Type: Adjust the sfpm based on the material. For example, quartz and agate (harder materials) require lower sfpm, while calcite or marble (softer materials) can be cut at higher sfpm.
3. Converting sfpm to Revolutions per Minute (rpm)
  • Conversion Formula: To convert sfpm to rpm, you'll need to know the diameter of your blade. The formula is rpm=sfpm×12�×diameter in inchesrpm=π×diameter in inchessfpm×12.
  • Practical Example: If you're aiming for an sfpm of 5500 and using a 10-inch diameter blade, the calculation will give you the optimal rpm setting for your saw.
4. Adjusting Saw Speeds
  • Variable Speed Saws: If your saw has variable speed settings, use the conversion formula to set your saw to the correct rpm for the material you're cutting.
  • Fixed Speed Saws: For saws with fixed speeds, you may need to adjust your cutting technique, such as feed rate or coolant flow, to accommodate different materials effectively.
5. Signs of Incorrect Speeds
  • Overheating: If the blade or material becomes too hot, it's a sign that the saw is running too fast. Overheating can cause cracks in the material and premature wear on the blade.
  • Chipping or Poor Quality Cuts: Running the saw too slow for softer materials can result in chipping or ragged cuts due to excessive force being applied.

Saw Types and Vise Configurations

larger lapidary saws offer a diverse range of capabilities, catering to the varied and specific needs of cutting larger or more complex stones. The equipment is often designed with versatility in mind, incorporating different types of vises and cutting mechanisms to handle a wide array of stone sizes, shapes, and materials efficiently.

Horizontal (sawmill) vises are robust and versatile, ideal for slicing through large, bulky stones. These vises mimic the functionality of traditional sawmills, allowing for the precise and straight cuts necessary for slabbing large specimens. The ability to adjust the vise for the thickness of the cut provides lapidaries with the flexibility to create slabs of varying sizes from a single piece of rough material.

Swinging arm carriages with clamp vises introduce an additional level of maneuverability. This setup enables the saw blade to approach the stone from different angles, facilitating complex cuts that would be challenging with a stationary vise. The swinging arm mechanism is particularly useful for executing intricate shapes or angles within a slab, offering a dynamic solution for more creative or custom lapidary projects.

Stationary vises with blades mounted on swinging arbors are designed for precision and stability. This configuration allows the blade to pivot while the stone remains securely fixed, minimizing movement and potential for error. It's an effective setup for detailed work on smaller pieces or for adding finishing touches to a cut, where control and accuracy are paramount.

The method for securing the vises and adjusting the cutting approach can vary significantly between manufacturers and models. Some systems employ weight feeds, where weights are used to apply a consistent force, feeding the stone into the blade at a steady rate. This method is especially effective for ensuring uniform cuts over longer periods, as it maintains consistent pressure without manual adjustment.

Power feeds automate the process, using motors to move the vise and stone towards the blade. This offers a high degree of precision and repeatability, with the added benefit of reducing manual labor and the potential for human error. The speed and pressure of the feed can often be adjusted, allowing lapidaries to fine-tune the cutting process according to the specific requirements of the material being cut.

Gravity-fed swinging arbors leverage the force of gravity to guide the cut, providing a simple yet effective mechanism for slicing through stones. This method is often used in combination with adjustable guides or counterweights to control the rate of descent, ensuring that the cut proceeds at the optimal speed for the material.

Understanding the functionalities and benefits of these different vise types and cutting mechanisms is crucial for lapidaries looking to expand their capabilities.

Safety and Setup Precautions

Regardless of the saw type or configuration, several key precautions should always be observed:

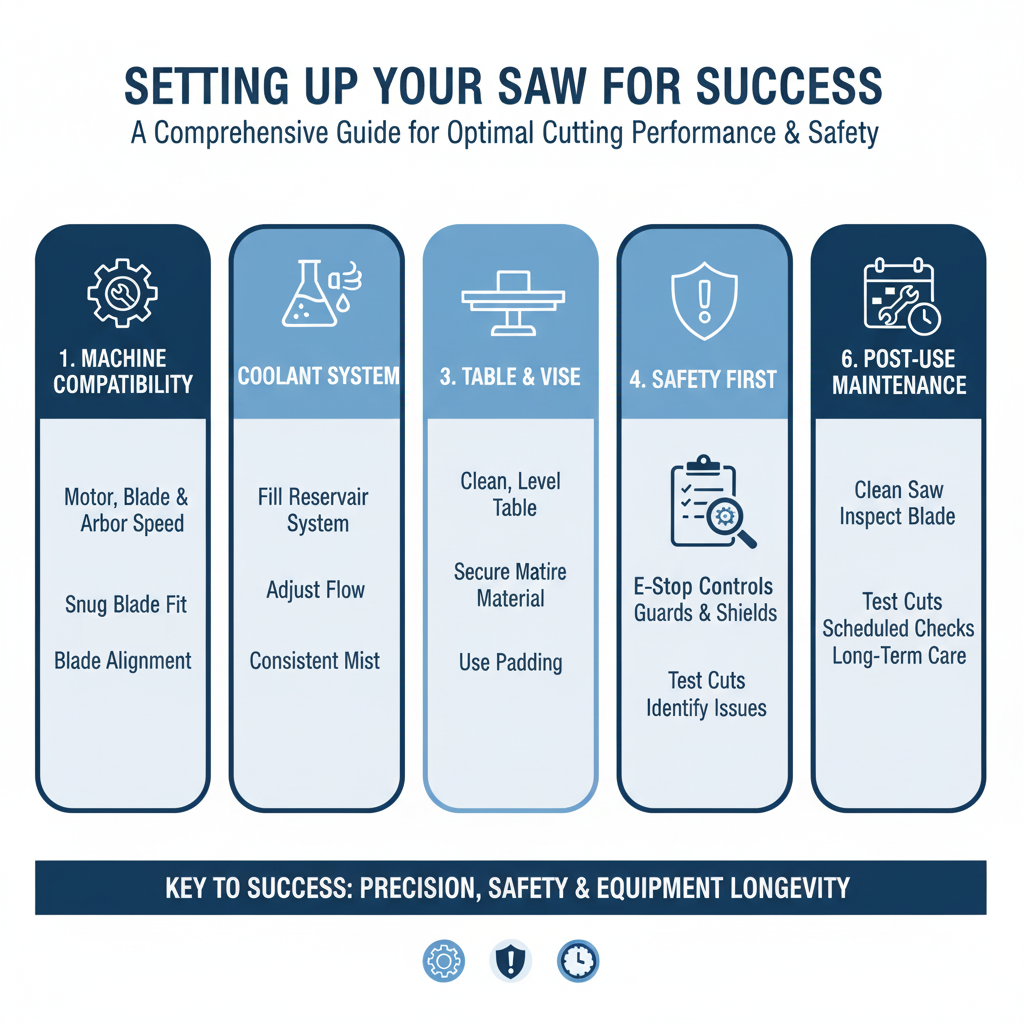
  • Ensure the blade is properly attached to the arbor and the collars are snugly fitted.
  • Maintain the correct coolant level in the saw.
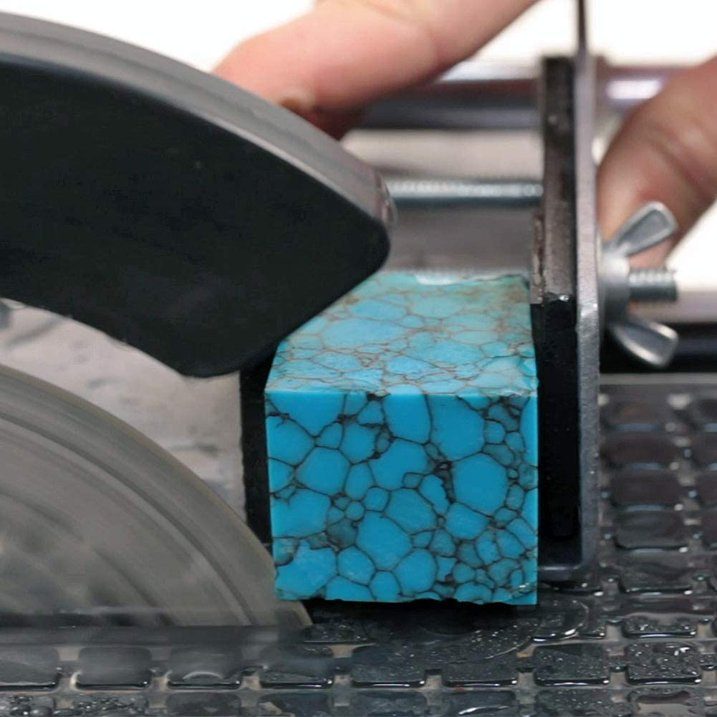
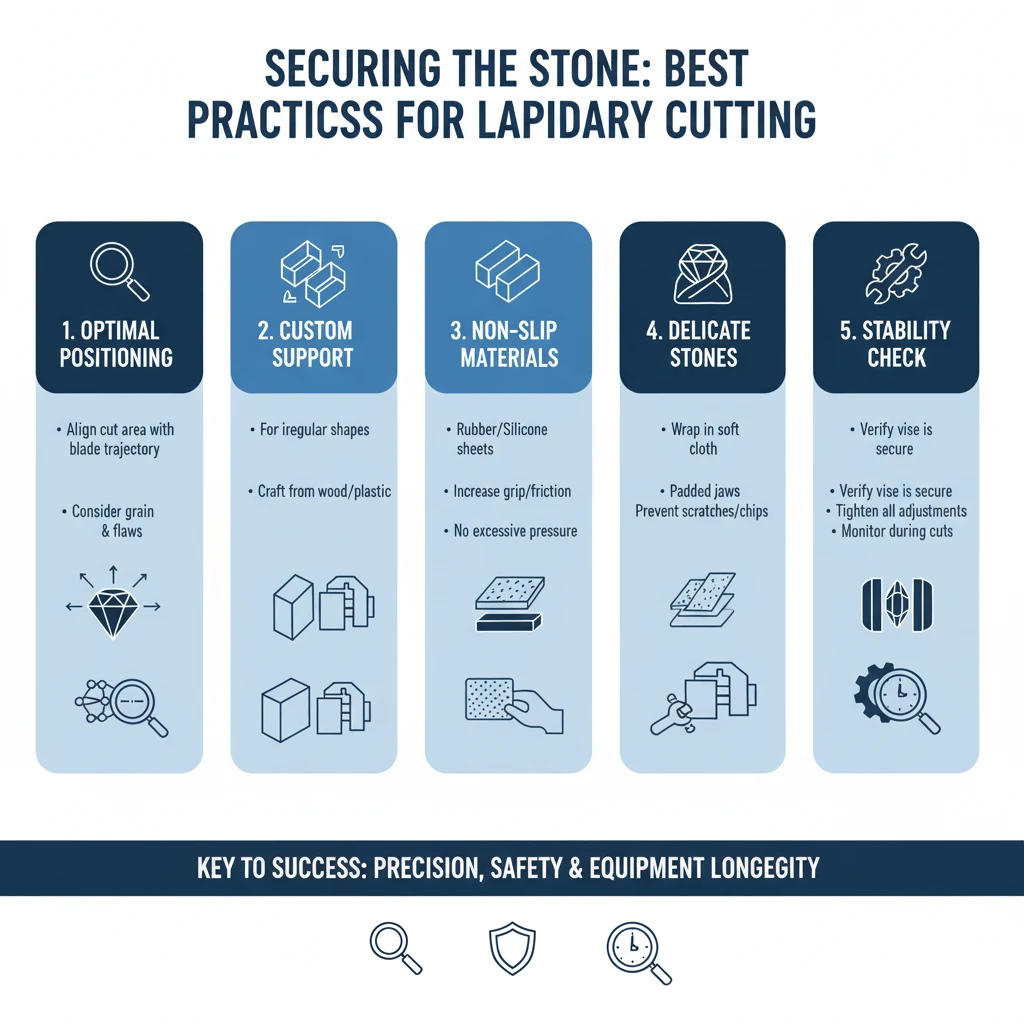
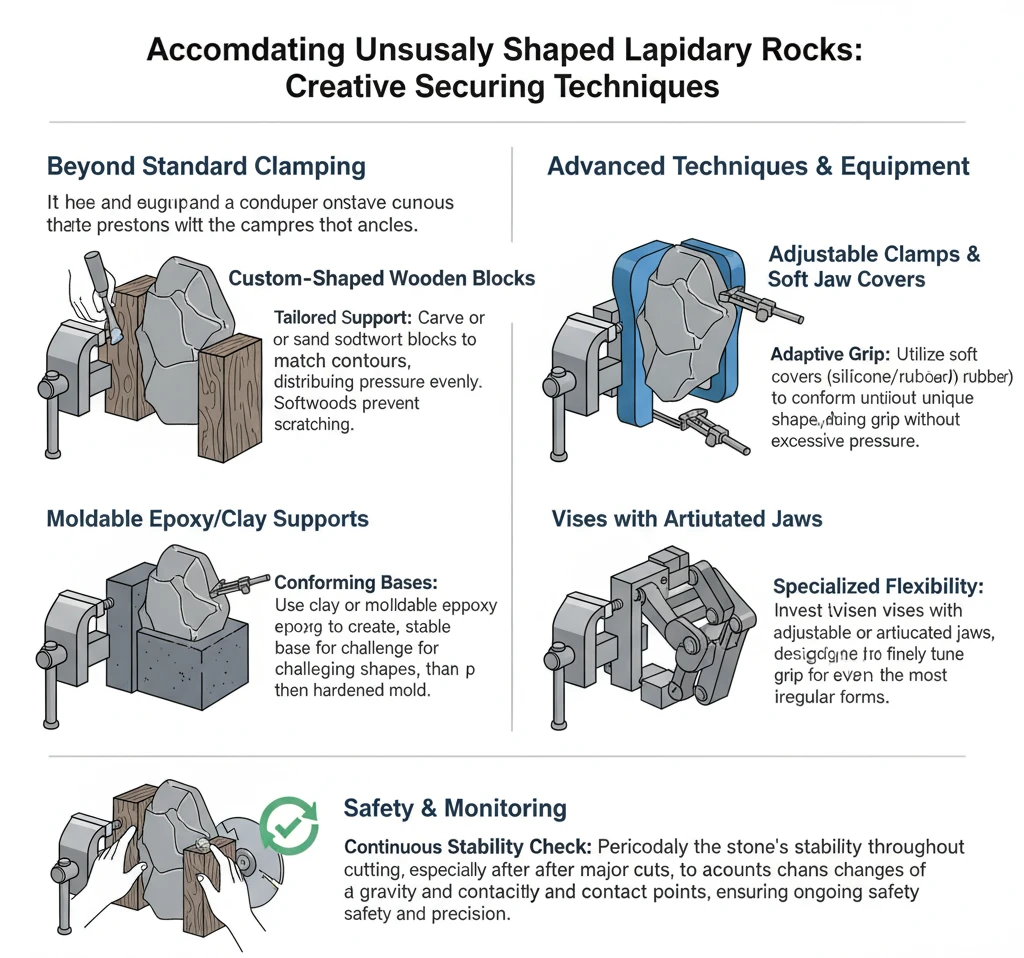
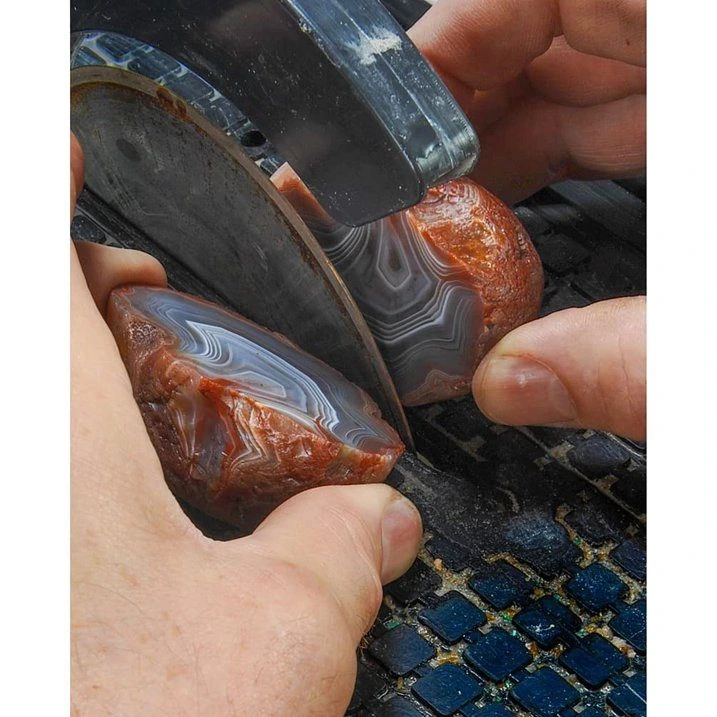
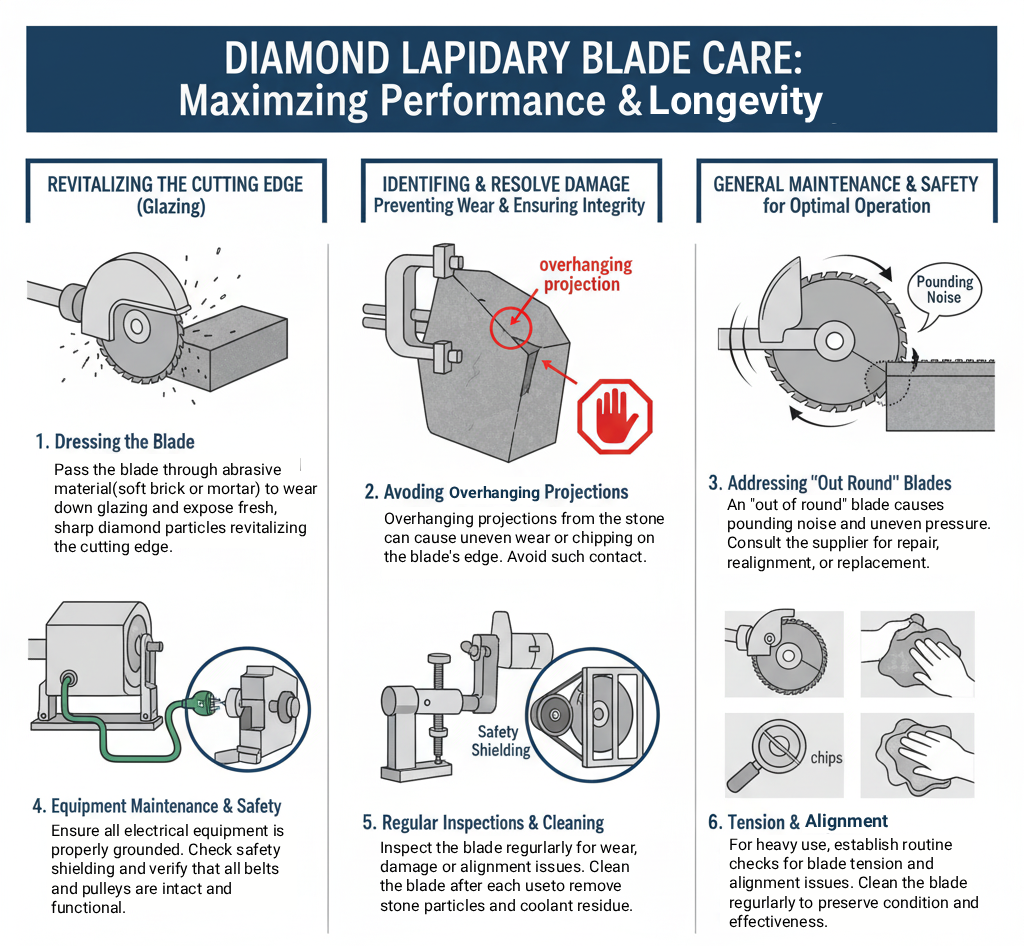
  • Prevent sharp edges or projections on the stone from coming into contact with the blade by either selecting a smooth area on the stone or grinding down any irregularities.

Securing the Stone

Securing the stone correctly is fundamental to successful and safe cutting operations in lapidary work. This step not only ensures precision in the cutting process but also safeguards the stone and equipment from potential damage. When placing the stone in the slab saw vise, attention to detail is paramount. The stone should be positioned so that the area to be cut aligns optimally with the blade's trajectory, taking into consideration the grain of the stone and any potential flaws or inclusions that could affect the outcome of the cut.

In addition to the initial securing techniques, there are several practices that can enhance the stability of the stone during cutting. For stones with irregular shapes or sizes that do not fit snugly in the vise, custom supports can be crafted from wood or plastic. These supports cradle the stone, distributing the clamping force more evenly and preventing any tilting or slipping during the cutting process.

Furthermore, the use of non-slip materials, such as thin sheets of rubber or silicone, between the stone and the vise jaws can greatly increase grip. These materials compress under pressure, conforming to the shape of the stone and providing additional friction that helps hold the stone firmly in place without the need for excessive clamping force, which could cause damage.

For particularly delicate or valuable stones, consider wrapping the contact points with soft cloth or using specially designed padded jaws. This not only prevents scratches or chips but also allows for a firm hold without applying undue pressure directly to the stone.

After securing the stone, a final check should be conducted to ensure that the setup remains stable under the conditions of cutting. This includes verifying that the vise itself is securely attached to the saw and that all adjustments have been properly tightened. It's also a good practice to monitor the stone's security periodically throughout the cutting process, especially when making deep cuts or working with larger, heavier stones.

Accommodating Unusually Shaped Lapidary Rocks

Accommodating unusually shaped lapidary rocks requires a blend of creativity and precision, ensuring that these unique pieces can be securely held for cutting without compromising their integrity. When dealing with such stones, the use of wooden blocks as support is indeed a practical solution, but further techniques can enhance the stability and safety of these operations.

Custom shaping of the wooden blocks to match the contours of the lapidary stone can significantly improve the grip and support provided. By carefully carving or sanding the wood, it can cradle the stone more effectively, distributing pressure evenly and minimizing the risk of damaging the stone. Additionally, using softwood blocks can be advantageous as they are less likely to scratch or chip the stone compared to hardwoods.

For lapidary materials with particularly challenging shapes, consider employing a combination of supports, including clay or moldable epoxy. These materials can be shaped to the stone's unique contours and, once hardened, provide a stable base that can be clamped within the vise. This method is especially useful for stones with curves or angles that wooden blocks alone cannot accommodate securely.

Another strategy involves the use of adjustable clamps or soft jaw covers that can conform to the stone's shape. These accessories can often be attached directly to the vise, providing an additional layer of flexibility and security. The use of non-slip materials, such as silicone pads or rubber matting cut to size, can also be placed between the stone and the supports to enhance grip without applying excessive pressure.

For lapidaries working regularly with unusually shaped stones, investing in a vise with adjustable or articulated jaws can be a game-changer. These vises are designed to accommodate a wide range of shapes and sizes, offering fine-tuned adjustments that can secure even the most irregularly shaped stones.

When securing an unusually shaped stone / rock, it's crucial to periodically check its stability throughout the cutting process, especially after making significant cuts that may alter the stone's center of gravity or contact points with the supports. This proactive approach ensures that the stone remains securely in place, reducing the risk of accidents or unwanted movement that could affect the precision of the cut.

Initiating the Cut

The process for beginning a cut with a weight-fed slab saw is similar to that used with a trim saw equipped with a slabbing vise. The key steps include firmly clamping the stone in the vise and adjusting the crossfeed to the desired thickness of the slab, ensuring a precise and secure cut.

Setting the Cut Thickness

Adjust the slab saw's crossfeed to the thickness you need for your cut. These crossfeeds usually employ a screw mechanism, which you operate by turning a crank to shift the carriage laterally. Start the saw's motor and manually guide the carriage towards the blade, applying minimal pressure to the stone to initiate a groove.

Attaching the Weight for Controlled Cutting

After making the initial groove, attach the designated weight to the cord as directed by the manufacturer's instructions. To prevent the stone from breaking through and potentially damaging the blade with its remaining protrusion, use a chain or another effective device to halt the carriage movement just before the cut completes.

Utilizing Power Feed Saws

Power feed saws represent a significant advancement in lapidary technology, offering precision and efficiency by automating the cutting process. These saws are particularly valuable for their consistency and ease of use, reducing manual labor and improving safety.

Power feed saws automate the carriage movement through a screw-feed mechanism, equipped with a release device for manual positioning. When preparing to cut, secure the stone in the vise, ensuring there are no sharp edges facing the blade. Advance the carriage so the stone is nearly touching the blade. Close any protective hoods to contain coolant spray and activate the motor.

The power feed will then draw the stone into the blade, with some saws featuring adjustable shutoff switches to automatically stop the saw at the end of the cut. If your saw lacks an automatic shutoff, monitor the cutting process closely to turn off the saw manually once the cut is finished.

1. Understanding Power Feed Mechanisms
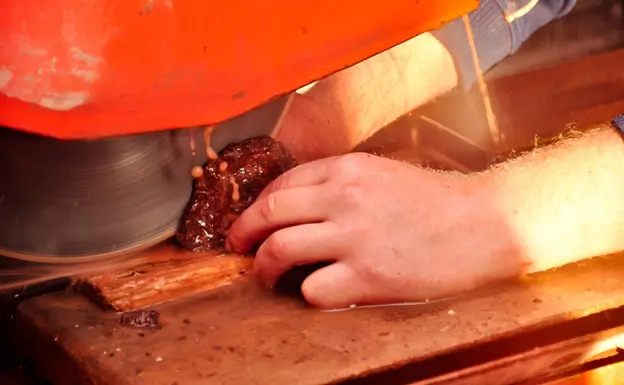
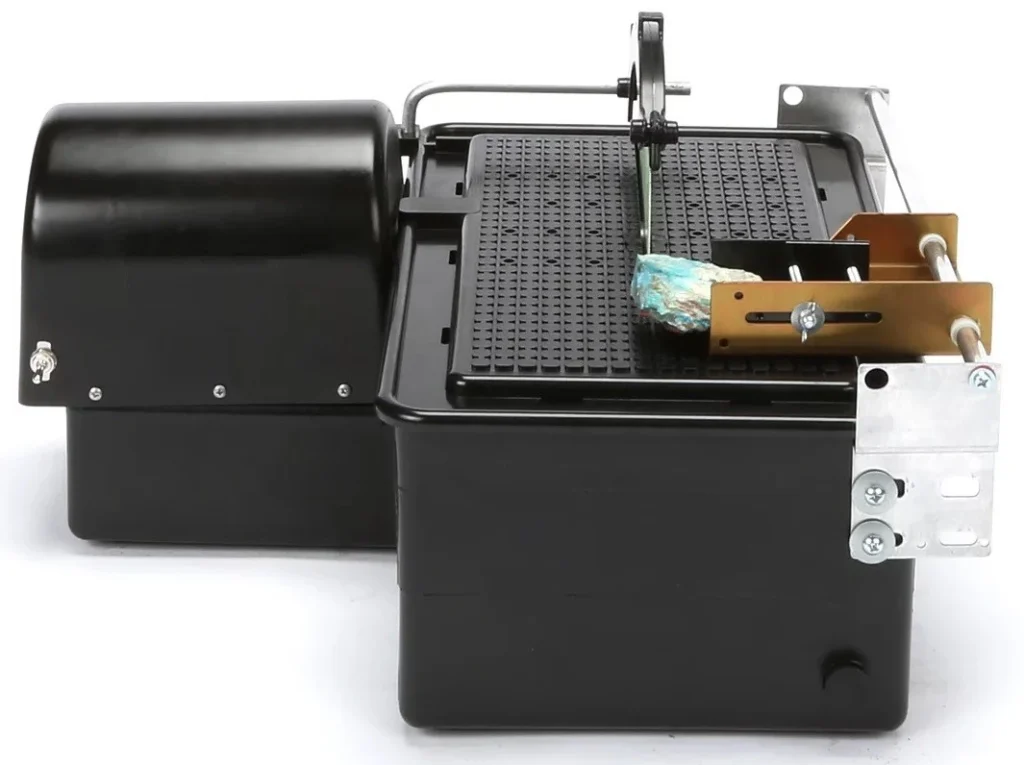
  • Screw-Feed Technology: The heart of a power feed saw is its screw-feed mechanism, which precisely controls the speed at which the stone is fed into the blade. Understanding how to adjust this feed rate according to the type of material being cut can significantly impact the quality of the cut.
  • Manual Release Device: Familiarize yourself with the manual release device. This feature allows for fine adjustment of the stone's position before engaging the power feed, ensuring the initial contact with the blade is precise and controlled.
2. Preparing the Stone for Cutting
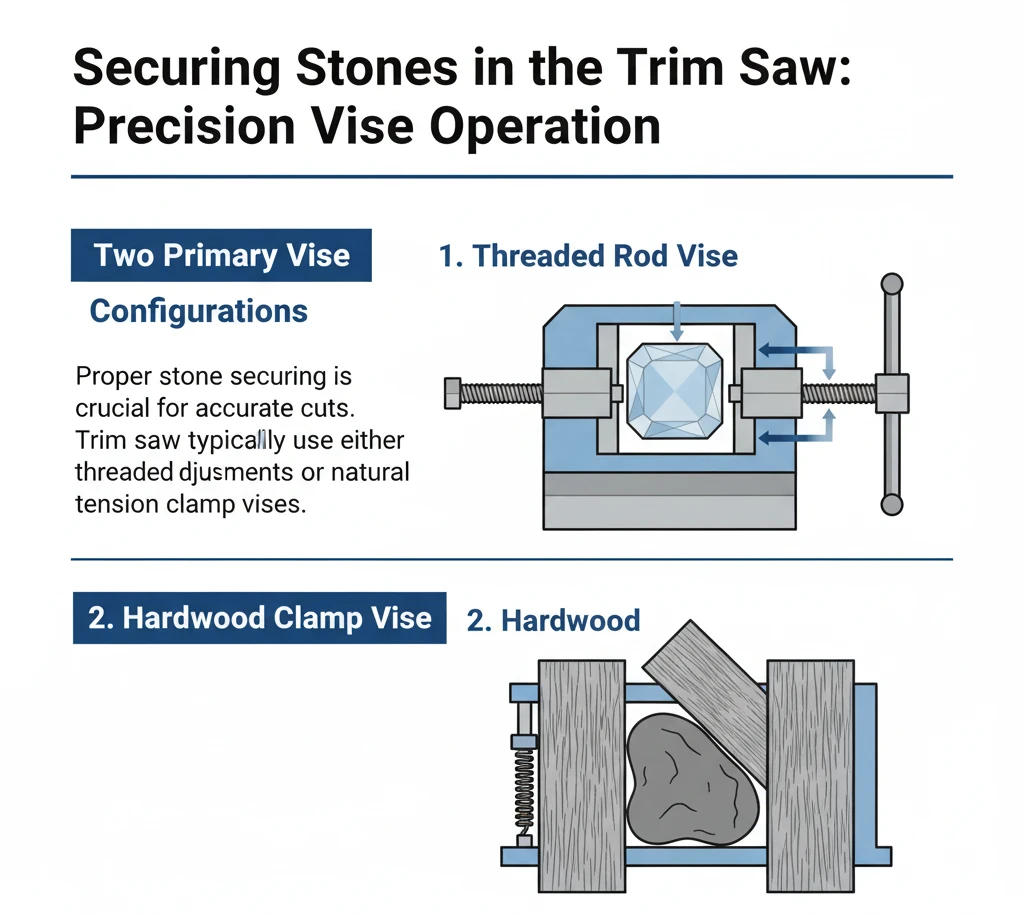
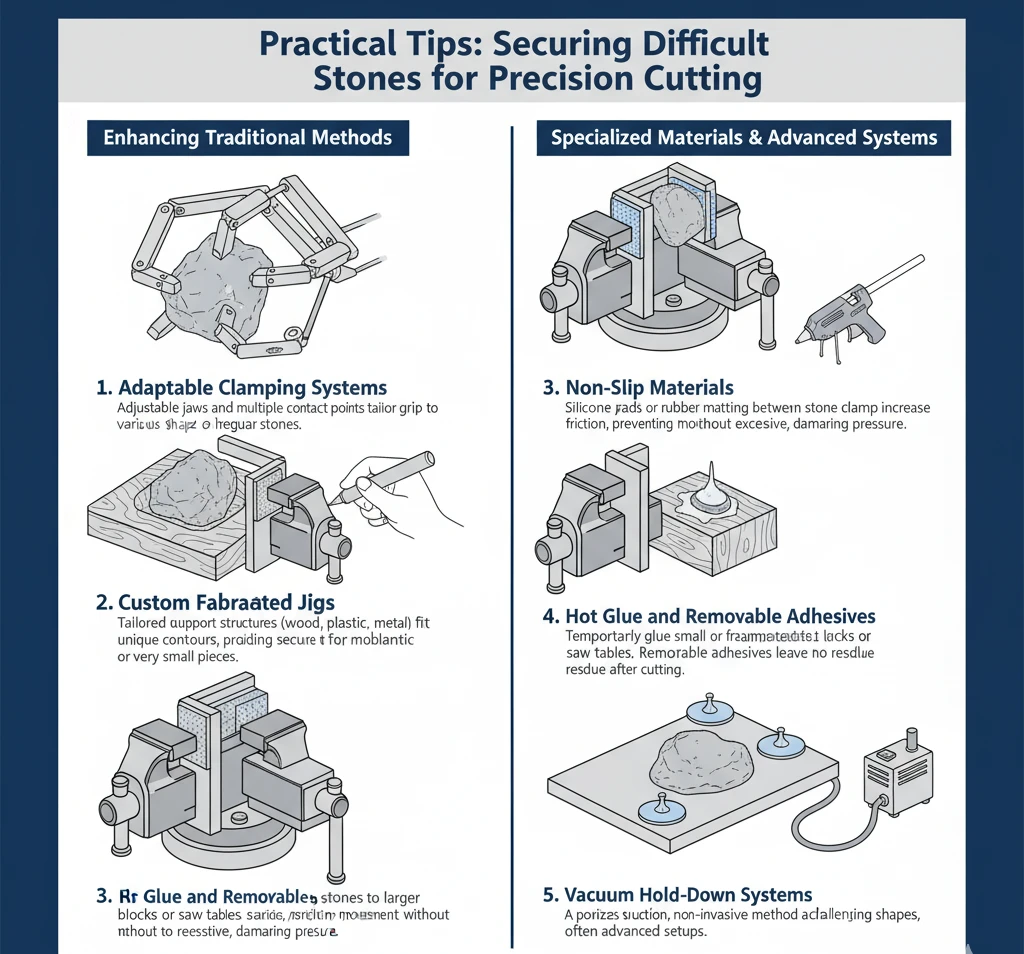
  • Securing the Stone: Properly securing the stone in the vise is crucial. Ensure the stone is firmly held but not so tightly that it could cause internal stress or cracking. For irregularly shaped stones, consider using shims or padding to achieve a secure grip.
  • Edge Preparation: If the stone has sharp edges, gently grind them down to prevent chipping or damage to the blade. This step is especially important for stones with natural fractures or cleavage planes.
3. Advanced Cutting Techniques
  • Variable Speed Settings: Take advantage of any variable speed settings on your power feed saw. Slower speeds can be beneficial for cutting harder materials, reducing the risk of blade overheating and stone cracking.
  • Multiple Passes: For thick or particularly hard materials, consider making multiple passes, incrementally cutting deeper with each pass. This technique can help prevent blade overload and ensures a smoother cut.
4. Utilizing Safety Features
  • Protective Hoods: Always use protective hoods or guards provided with the saw. These are designed to contain coolant spray and protect you from flying debris.
  • Emergency Stops and Shutoff Switches: Familiarize yourself with the saw's emergency stop button and any automatic shutoff switches. These features are critical for safety and can prevent damage to the saw and the workpiece in case of a malfunction.
5. Monitoring and Maintenance
  • Ongoing Observation: Even with automatic feed, it's important to monitor the cutting process. Look for signs of blade overheating, such as excessive steam or a change in the sound of the cut, which can indicate that the blade is under too much stress.
  • Routine Maintenance: Keep the screw-feed mechanism clean and lubricated. Regular maintenance checks can prevent wear and tear on the feed mechanism, ensuring consistent performance and extending the lifespan of the saw.
6. Optimizing for Different Materials
  • Adjustable Shutoff: Utilize adjustable shutoff switches for materials that require precise cutting lengths. This feature is invaluable for repetitive cuts or when working with valuable materials where precision is paramount.
  • Coolant Considerations: Adjust the type and flow of coolant based on the material being cut. Some stones may require more coolant to prevent thermal shock, while others might need less to avoid washing away delicate features.
Post-Cutting Cleanup

After the meticulous process of cutting gemstones, ensuring the cleanliness of your slabs is paramount for the next stages of lapidary work. Proper cleaning not only preserves the quality of the gemstone but also prepares it for precise shaping, polishing, or mounting. Here’s a detailed guide to effective post-cutting cleanup procedures:

1. Initial Rinse and Soak
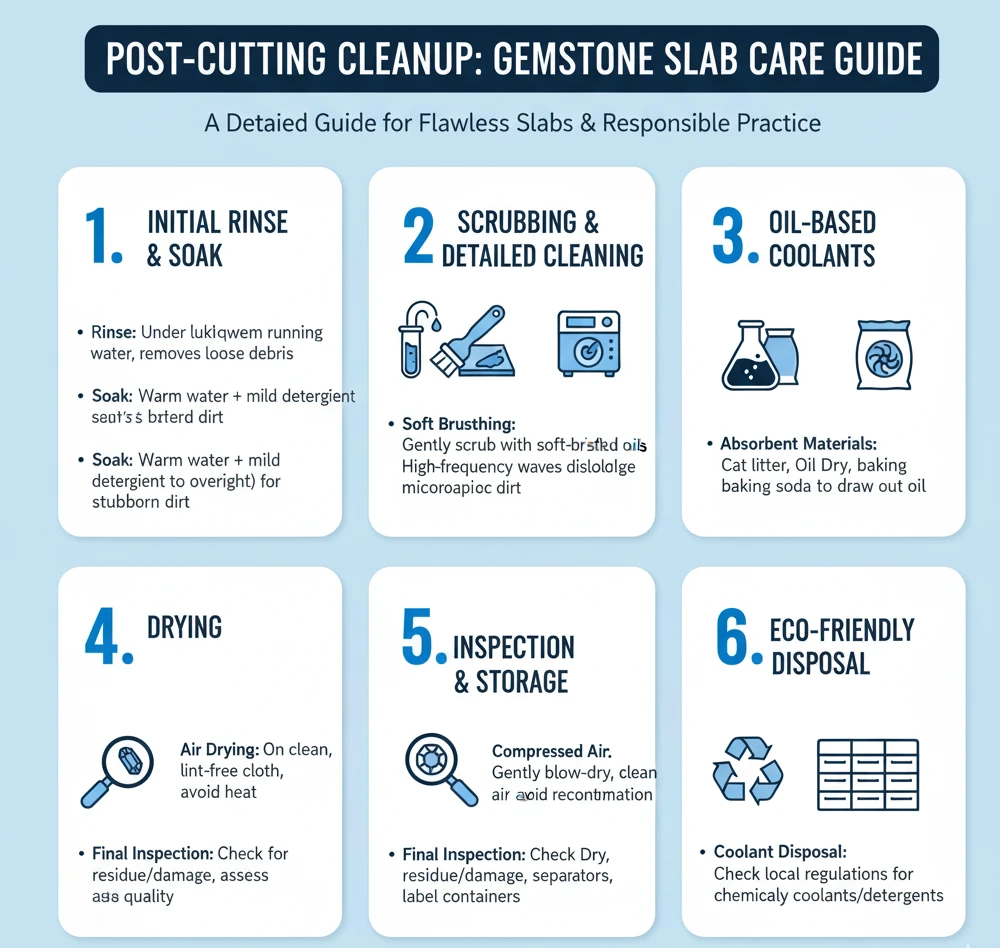
  • Rinse: Begin by rinsing your slabs under lukewarm running water. This initial rinse helps remove any loose debris or coolant residue.
  • Soak: For more stubborn contaminants, soak the slabs in a container filled with warm water and a mild detergent. The duration of the soak can vary from a few hours to overnight, depending on the level of contamination.
2. Scrubbing and Detailed Cleaning
  • Soft Brushing: After soaking, use a soft-bristled brush (e.g., a toothbrush or a paintbrush) to gently scrub the slabs. This action helps dislodge any remaining particulate matter lodged in the crevices or surface irregularities.
  • Ultrasonic Cleaning: For slabs with intricate details or stubborn contaminants, an ultrasonic cleaner can be an effective tool. It uses high-frequency sound waves to agitate the liquid, dislodging dirt and debris at a microscopic level.
3. Dealing with Oil-Based Coolants
  • Detergent Solution: If an oil-based coolant was used, a stronger detergent solution might be necessary. Consider using a degreaser or a cleaner designed specifically for cutting oils. Test on a small, inconspicuous area first to ensure it doesn’t harm the stone.
  • Absorbent Materials: As mentioned, cat litter or Oil Dry are excellent for drawing out oily residues. Alternatively, you can use baking soda or diatomaceous earth for their high absorbency. Spread the absorbent material over the slabs and gently rub it in to help absorb the oil.
4. Drying
  • Air Drying: After cleaning, allow the slabs to air dry on a clean, lint-free cloth or a drying rack. Avoid using heat sources as they can cause some stones to crack or become discolored.
  • Compressed Air: For speeding up the drying process or removing water from hard-to-reach places, gently use compressed air. Ensure the air is clean and free of oil or moisture to avoid recontamination.
5. Inspection and Storage
  • Final Inspection: Once dry, inspect each slab for any remaining residues or damage incurred during the cutting or cleaning process. This is also an ideal time to assess the slab’s quality and suitability for its intended next step.
  • Proper Storage: Store the cleaned slabs in a dry, organized manner. Use separators like foam or cloth to prevent scratching, and clearly label the storage containers for easy identification.
6. Environmentally Friendly Disposal
  • Coolant Disposal: Dispose of used coolants and cleaning solutions responsibly. Check local regulations for the disposal of chemical substances and consider using eco-friendly coolants and detergents for future projects.

Practical Tips for Cutting and Handling Stones

Securing Difficult Stones:

Securing difficult stones for cutting is a common challenge in lapidary work, requiring innovative solutions to ensure precision and safety. When traditional methods fall short, specially designed clamping devices provided by lapidary saw manufacturers come into play, offering a secure grip on stones that might otherwise be too awkward or small to safely cut. Expanding on this concept, there are several additional strategies and tools that lapidaries can utilize to effectively secure and cut challenging stones.

Adaptable Clamping Systems

Many lapidary saws are compatible with a range of adjustable clamping systems. These systems are engineered to accommodate stones of various shapes and sizes, featuring adjustable jaws and points of contact that can be tailored to the specific dimensions of the stone. For stones with irregular shapes, these clamps can be adjusted to provide multiple points of contact, ensuring that the stone is held firmly in place from different angles.

Custom Fabricated Jigs

For particularly problematic stones, custom jigs can be fabricated out of wood, plastic, or metal. These jigs are designed to fit the unique contours of a stone, providing a tailored support structure that can then be secured to the saw’s table or vise. This method is especially useful for stones with unusual shapes or for very small pieces that standard clamps cannot hold securely.

Use of Non-Slip Materials

Incorporating non-slip materials such as silicone pads or rubber matting between the stone and the clamping device can significantly enhance grip. These materials compress under pressure, increasing friction and preventing the stone from moving without the need for excessive force, which could potentially cause damage.

Hot Glue and Removable Adhesives

A temporary but effective method to secure difficult stones is the use of hot glue or other removable adhesives. The stone can be glued to a larger, more easily secured block or directly to the saw table. Once cutting is complete, the glue can be removed with little to no residue, leaving the stone and equipment unharmed. This method is particularly useful for small stones or fragments.

Vacuum Hold-Down Systems

Advanced setups may include vacuum hold-down systems, which use suction to secure the stone to the cutting surface. While more commonly found in industrial settings, portable vacuum systems can be adapted for lapidary use, offering a powerful and non-invasive method to hold stones in place during cutting.

Slicing Pebbles Efficiently:

For those with numerous pebbles to slice, embedding them in a block of casting plaster presents a time-efficient solution. Start by cleaning the pebbles with detergent to remove any oils, which could compromise their adherence to the plaster. Utilize a small container, such as a milk carton, as a mold that fits into your saw vise. Arrange the pebbles in the container, cover them with mixed plaster, and allow it to set. Once solidified, the plaster block can be placed directly in the saw vise for slicing.

Maintaining Your Saw

Preventing Wear and Tear:

Maintaining your lapidary equipment is crucial for ensuring its longevity, safety, and efficiency. Continuous sawing generates stone chips and sludge that can accumulate on the saw table or in the mechanism's pathways. Regular cleaning is essential to prevent potential damage and wear to the saw. Additionally, ensure that any bearings or bushings are adequately lubricated, except those that are sealed and greased.

1. Comprehensive Cleaning Regimen
  • Daily Cleaning: After each use, wipe down the saw to remove stone chips, dust, and coolant residue. Use a soft brush or compressed air (at a low pressure) to clear debris from hard-to-reach areas.
  • Weekly Deep Cleaning: Dedicate time each week for a more thorough cleaning. This includes disassembling parts of the saw as per the manufacturer’s instructions to clean sludge buildup in the water tank, blade housing, and mechanism pathways.
2. Lubrication for Longevity
  • Lubrication Schedule: Follow the manufacturer’s guidelines for lubricating moving parts, bearings, and bushings. For components not sealed or pre-greased, apply appropriate lubricants, ensuring not to over-lubricate, as excess can attract dust and debris.
  • Choice of Lubricant: Use only the recommended type of lubricant for your equipment. Avoid using substitutes that might degrade rubber or plastic parts or cause dust and debris to adhere.
3. Regular Inspections and Adjustments
  • Wear and Tear Checks: Periodically inspect blades, bearings, and bushings for signs of wear or damage. Look for uneven blade wear, which could indicate misalignment, and listen for unusual noises that could signify bearing failure.
  • Adjustments and Alignment: Ensure that all components are correctly aligned according to the manufacturer's specifications. Misalignment can cause uneven wear and tear, reducing the efficiency and lifespan of your saw.
4. Blade Maintenance
  • Blade Inspection: Regularly check the blade for cracks, wear, and tension. A dull blade requires more force to cut, putting additional strain on the motor and bearings.
  • Blade Dressing: Use a dressing stone to keep diamond blades sharp. This removes glazing and exposes new diamond edges, improving cutting efficiency.
5. Controlling Sludge and Debris
  • Effective Coolant Use: Maintain the correct coolant level and concentration to minimize sludge formation. Clean and replace coolant regularly to prevent contamination that can accelerate wear.
  • Sludge Management: Implement a routine for removing sludge from the water tank and channels. Consider using a filter system to catch debris before it settles.
6. Storage and Environment
  • Proper Storage: Store the saw in a clean, dry place to prevent rust and corrosion. Cover the saw to protect it from dust and moisture when not in use.
  • Environmental Considerations: Operate and store your lapidary equipment in an environment with stable temperature and humidity. Extreme conditions can affect the materials and lubricants used in your saw.
7. Record Keeping
  • Maintenance Log: Keep a log of all maintenance activities, including cleaning, lubrication, part replacements, and inspections. This record can help track the equipment’s condition over time and predict when maintenance or replacements are needed.
Coolant and Sludge Management:

Effective management of coolant and sludge is crucial for maintaining the performance of your lapidary saw and ensuring a clean, safe working environment. Over time, a mix of rock dust and coolant will collect in the saw's tank. This mixture should be periodically removed, either by scooping it out or using the saw's drain plug. To reuse the coolant, filter it through cheesecloth or let the sludge settle in buckets and then decant the clear liquid.

Here’s how to handle these substances efficiently:

1. Regular Monitoring and Removal
  • Scheduled Cleaning: Establish a regular schedule for inspecting and cleaning the saw's tank. The frequency will depend on usage intensity, but even with light use, monthly checks are advisable.
  • Efficient Removal Techniques: In addition to scooping or draining, consider using a wet/dry vacuum cleaner for efficient sludge removal. This method can be particularly effective for reaching sludge at the bottom or corners of the tank.
2. Coolant Filtration and Reuse
  • Filtration Methods: While cheesecloth is effective, for finer filtration, consider using a coffee filter or a fine mesh paint filter. These can capture smaller particles, resulting in cleaner coolant for reuse.
  • Settling and Decanting: Allow the sludge and coolant mixture to settle in a designated container for several days. Once the sludge has settled at the bottom, carefully decant the clear liquid from the top. This process can be accelerated by using flocculants that help particles clump together and settle faster.
3. Enhancing Coolant Life
  • Coolant Additives: Use additives designed for lapidary coolants to prevent algae growth and reduce rust formation on your equipment. Always follow the manufacturer’s recommendations for additive use.
  • Coolant Rotation: Rotate between two or more batches of coolant. While one batch is in use, allow the other to settle, cleaning it for future use. This rotation system ensures a continuous supply of clean coolant.
4. Disposal and Environmental Considerations
  • Responsible Disposal: Dispose of coolant and sludge in accordance with local environmental regulations. Some components of the sludge may be hazardous, and improper disposal can harm the environment.
  • Recycling Options: Explore options for recycling the coolant if available in your area. Some service providers specialize in processing used coolants, making them suitable for reuse.
5. Workspace and Equipment Considerations
  • Preventative Measures: To minimize sludge buildup, consider using splash guards and trays under your saw. These can catch excess coolant and stone particles, reducing the amount that ends up in the tank.
  • Equipment Upgrades: For high-volume cutting operations, consider upgrading to a saw with a built-in filtration system. These systems continuously clean the coolant, reducing the need for frequent manual cleaning.
6. Health and Safety Measures
  • Protective Gear: When handling coolant and sludge, wear appropriate protective gear, including gloves and eye protection, to avoid contact with potentially harmful substances.
  • Ventilation: Ensure good ventilation when cleaning the tank or handling chemicals to prevent inhalation of harmful fumes or dust.

Blade Care:

Proper care and maintenance of diamond wafering blades are crucial for lapidary work, especially when working with a variety of materials, from the softest to the hardest gemstones. The meticulous upkeep of these blades involves more than just regular cleaning; it encompasses a series of proactive steps and remedies for common issues that can arise from their continuous use.

Over time, the rigors of cutting through hard materials such as jade can lead to the dulling of the diamond blade. This dullness is often a result of the metal bond around the diamond particles becoming glazed, a condition that significantly reduces the blade's cutting efficiency. To counteract this, passing the blade through an abrasive material like soft brick or mortar can act as a corrective measure, effectively wearing down the glaze and exposing fresh, sharp diamond particles at the surface. This method, known as "dressing" the blade, revitalizes its cutting edge and extends its usable life.

Additionally, the physical integrity of the blade can be compromised by factors such as overhanging projections from the stone being cut. These projections can cause uneven wear or chipping on the blade's edge. Similarly, a blade that is out of round can lead to uneven cutting pressures, manifesting as a pounding noise during operation and potentially leading to premature wear or damage to both the blade and the saw. In such cases, it is crucial to cease operation and consult with your blade supplier regarding the best course of action, whether it involves repair, realignment, or replacement.

To maintain optimal blade condition, it is also essential to ensure that all related equipment is properly maintained and safely operated. This includes grounding all electrical equipment to prevent electrical hazards and ensuring that safety measures such as shielding for belts and pulleys are intact and functional. These precautions protect not only the blade but also the operator from potential harm.

Moreover, regular inspections of the blade for signs of wear, damage, or alignment issues can preemptively address problems before they escalate. Cleaning the blade after each use to remove any accumulated stone particles or coolant residue can also prevent buildup that might otherwise impede the blade's performance. For blades that see heavy use, establishing a routine for checking and adjusting tension and alignment can further preserve their condition and effectiveness.

ARE YOU USING RIGHT LAPIDARY BLADES

FOR YOUR APPLICATION?

LET US
HELP YOU

HAVING ISSUES WITH

YOUR CURRENT LAPIDARY BLADES?

Knowledge Center

What you should know

your next diamond lapidary blade?